Monday, May 23, 2011

Kat Von D True Romance Eyeshadow Palette in Angeles: Cool Blues Meet Warm Browns!

So my love for Kat Von D palettes continues.  I love these palettes for a couple reasons.  First, they always have amazing colors that are fashion forward and highly pigmented.  Secondly, the colors all work well together, so I don't have to think too hard to get a great look with these palettes.  Collector that I am, I realized I have a yearning to buy them all.  So far, I have four:  Adora, Ludwig, Angeles, and Truth.  Adora and Truth are definitely more Fall/Winter palettes, and Angeles and Truth are very Spring/Summer.

I initially saw the Angeles palette on the Sephora website.  I immediately loved the blues, even though I was scared to death to use blue eyeshadow.  The lady who did my makeup for my wedding used powder blue eyeshadow to match my blue hydrangea bouquet, and I'm still traumatized from that.  It took a long time for the Angeles palettes to actually show up in the stores.  I couldn't bring myself to buy this off their website without first checking out these blues and making sure they weren't going to look hideous on my hazel eyes.  Once I was able to actually play with them in the Sephora store, I knew within about 10 seconds that I had to have this palette!

THE PALETTE


TOP ROW:  
Venus:  shimmer bronze
Leather:  matte dark chocolate brown (repeat from the Ludwig & Beethoven palettes)
Specimen:  pearly medium brown
Rehab:  pearly beige (repeat from Truth palette)

BOTTOM ROW:
Peggy:  pearly turquoise 
Bukowski:  pearly aqua
Bellbottom:  pearly slate blue
Morphine:  iridescent white cream with blue, green, and lavender flash

SWATCHES:


My favorite color in the palette is Peggy followed by Bukowski.  These aqua blues really say Summer time to me.  I also love the coppery shimmer of Venus.  As mentioned above, two colors are repeats from previous palettes (Leather and Rehab).  This is a plus for me, because I'm still getting 6 new colors, plus Leather and Rehab are very versatile, and I turn to these colors often for crease and highlight colors.  As usual, a cream shadow has been included (Morphine).  I'm not a fan of Kat's cream shadows, because they have little staying power and are very hard to blend.  However, I found I can use a touch of Morphine in the inner corners of my eyes to really bring some light to them.  

This palette offers a lot of versatility.  You could stay on the warm side and do Venus on the lid, Specimen in the crease, Leather in the outer corner, and Rehab on the brow bone.  Or you could go totally with the cool side and use Peggy on the lid, Bellbottom in the crease, Bukowski in the outer corner, and Morphine on the brow bone.  

Or if you're like me, you're afraid to do an all blue eye, because it brings back memories of your mom going to the disco in 1974 with her afro wig and white pantsuit.  So I created a look that is based primarily in the cool blues and warmed up with a little of the browns:


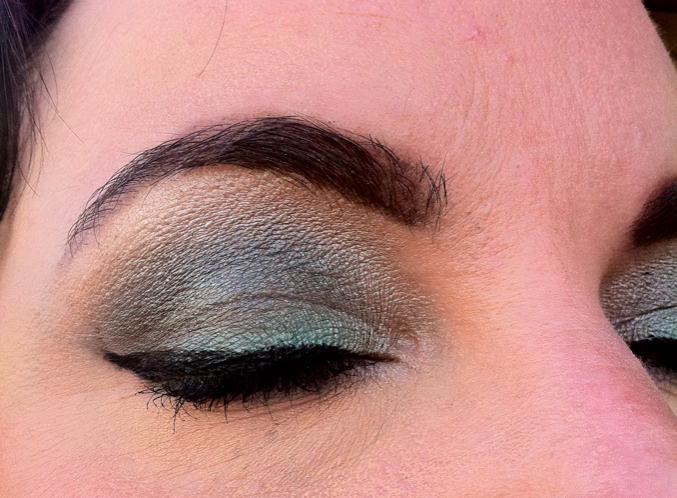
Average White Girl Recipe For Kat Von D Truth Angeles Cool meets Warm Eye:
  1. Prime eyes with Stila Primer Pot in Taffy (or your favorite primer).
  2. Apply Rehab to inside corner of eye and bring up and along the brow bone.
  3. Pack lid with Peggy.
  4. Use a fluffy crease brush and grab some Bellbottom.  Work it into your crease and up to the brow bone.
  5. Use a stiff dome brush or pencil brush and grab some Leather.  Apply this sparingly to the outside corner of the eye to lightly blend up a bit to provide contour and definition to the eye.
  6. Apply Bellbottom to the lower lash line from the outer corner and blend towards the inner corner (stop 2/3 of the way to the inner corner).
  7. Apply Rehab to the lower lash line from the inside corner and blend it into the Bellbottom.
  8. Go back with more Peggy and apply to lid again.
  9. Go back with more Rehab and apply to brow bone again.  Be sure to blend it down into the Bellbottom, but not too far down.  Just enough to soften the line.
  10. Line top lash line with your favorite black eyeliner.  
  11. Curl lashes and apply your favorite black mascara to both top and bottom lashes.  
  12. Optional:  take your ring finger and apply a dab of Morphine to the inner corner of each eye to bring more light to the eyes.  Don't use too much, just a dab.
So what I did here was use the fun blues, but I warmed them up a bit with the brown tones.  So instead of having eyes that scream I'M WEARING BLUE EYESHADOW!!!, you have just a hint of aqua with the brown neutralizing it a bit.  The Rehab on the brow bone also helps lessen the bright factor of the blue.  

I'm so happy with this palette.  And I think it helped me finally get over my fear of blue eyeshadow!  I look forward to pairing up these aqua blues with the luscious citron colored Long Distance from the Truth palette and doing a very fun and tropical eye for the summer....so stay tuned!


Tuesday, April 26, 2011

Makeup Geek challenge - Pink, Lavender and Aqua

Makeup Geek just posted a Spring Colors challenge for a look based off this collage:


Essentially, an aqua/pink/lavender color block:


I've never entered a Makeup Geek contest before, but a makeup friend of mine suggested I submit a look.  I don't expect to win--I entered for the fun of it.  These are three colors that I would've never really thought to put together.  It was fun to try a look that I otherwise would've never done.  Here is what I came up with:


Here is the recipe for this look:
  • NYX Eye Shadow Base in White
  • Lid: Finland, Kat Von D 'Truth' palette
  • Crease: Rehab, Kat Von D 'Truth' palette
  • Outer V: Prague, Kat Von D 'Truth palette
  • Brow bone: NYX Prune
  • Under brow arch: Sister, Kat Von D 'Truth' palette
  • Crease dusted with NYX Glitter Powder in Purple
  • Outer 2/3 of lower lash line: Prague, Kat Von D 'Truth' palette
  • Inner 1/2 of lower lash line: Finland, Kat Von D 'Truth' palette
  • Eyeliner: Maybelline Eye Studio Lasting Drama Gel Eyeliner in Black
  • Mascara: Covergirl LashBlast Luxe Mascara in Black Platinum
So try it out!  You may be surprised what you can get when you experiment with fun colors!

Click here to view other entries in the Makeup Geek Spring Colors challenge.

Thursday, April 21, 2011

My First Birchbox!


I recently signed up for a service called Birchbox.  It's a $10 per month service where you are sent at least 3 deluxe samples of beauty products right to your mailbox.  It's a fantastic deal, because for the money you spend, you actually get more than $10 worth of product.  It's also a way to try things that you wouldn't normally, and you can see if you like something before you spend money on the full size product.

Needless to say, I was excited to receive my first Birchbox in the mail the other day.  First, here are pictures of what my box looked like upon receiving it and opening it:

Straight from the mailbox

Product box

First look upon opening - product info card

All the goodies packed so beautifully!

From left to right:  LIV GRN Earth Eau de Parfum, Juice Beauty Stem Cellular Repair Moisturizer, Zoya product line booklet and polish spoon set, Zoya nail polish in Jules, Juice Beauty Green Apple Peel, Weleda Wild Rose Smoothing Facial Lotion.  Bloomin Seed Card pictured in front of products.


This month, in honor of Earth Day, Birchbox partnered with EcoFabulous and greened the box, inside and out.  The products are all earth-friendly.  And every bit of Birchbox packaging, from the tissue paper to the information card, is recyclable (this month and every month).  The box itself is sturdy, and I plan to repurpose it for craft/makeup supplies or jewelry.

Here is a run down on the products included in the April Birchbox:


Juice Beauty Green Apple Peel: A potent alpha and beta hydroxy acid complex with certified organic apple, lemon, grape, raw cane sugar and willow bark delivers spa-grade exfoliation. This full strength facial peel will reveal a natural, brighter complexion while firming the skin and eliminating the appearance of fine lines and wrinkles.  I noticed that this product is not recommended for sensitive or rosacea skin, like mine.  So I plan to use it only on my oily T-zone area.  They do, however, offer a peel for sensitive skin as well.
Full size (2 fl oz.) $45.  Birchbox deluxe sample (0.5 fl oz.) $11.25


Juice Beauty Stem Cellular Repair Moisturizer:  A proprietary blend of fruit stem cells deeply penetrates the skin to repair DNA damage and encourage new cell growth to aggressively firm and eliminate wrinkles. Antioxidant-rich fruit juices, fat-soluble Vitamin C and plant oils hydrate and improve elasticity for lasting, advanced age defy results.
Full size (1.7 fl oz.) $65.  Birchbox deluxe sample (0.07 fl oz.) $2.68


LIV GRN Earth Eau de Parfum:  Made from biodegradable and sustainable ingredients, this lush scent is laced with jasmine and sandalwood.  Plus, ten percent of sales go directly to Global Green
Full size (3.4 fl oz.) $60


Weleda Wild Rose Smoothing Facial Lotion:  A silky lotion that adds major hydration without feeling heavy.  Organic rosehip oil is rich in antioxidants and vitamins A and E, which work to soften and protect skin.
Full size (1 fl oz.) $28.  Birchbox deluxe sample (0.17 fl oz.) $4.76


Zoya nail polish in Jules:  Green is glam, especially when it comes to Zoya’s super glossy lacquers.  This versatile metallic hue is your new spring go-to.  Getting this full size bottle of Zoya polish made the whole Birchbox worth it to me.  I am currently obsessed with Zoya polish.  I immediately put a couple of coats of this polish on, and days later, it still has not chipped.  It wears much better than OPI, in my opinion.  The box also came with a Zoya product line booklet that shows every single color they make, along with a set of color spoons for all six colors in the Intimate Collection:  Marley, Dove, Caitlin, Dannii, Jules, and Gemma. Zoya Color Spoons are clear plastic, spoon shaped devices with actual nail polish poured in the nail shaped tip. Simply hold them up to your nails and see what the actual color will look like on your nails as though you applied two coats and a clear topcoat.
Full size sample included in Birchbox (0.5 fl oz.) $8

The color spoons are very true to how it looks on.


Every month, Birchbox throws in something extra.  This month, it was a Bloomin seed paper.  Plant this handmade paper in soil, give it a little water, and watch it sprout into wildflowers.  My daughters are so excited about this!  Although in Phoenix we’re already hitting the 90s, so I’m not sure how well the wildflowers will like it here!

As you can tell, I’m thrilled with the Birchbox service.  For only $10, what I received in this month’s Birchbox was valued at $26.69.  And that doesn’t include the value of the LIV GRN Eau de Parfum, since I’m not sure how many fluid ounces are in the glass sampler bottle.

Birchbox also offers a really fantastic points program.  You earn 1 point for every dollar you spend.  So I automatically get 10 points each month for the Birchbox.  Then you can earn 10 points for each product review survey you fill out on their website of the samples you received in your Birchbox.  And finally, you can earn 50 points for each friend you refer who becomes a Birchbox member.  So if you decide to join Birchbox, please let them know Diane Drozdowski referred you (thanks!).  Birchbox has a shop with full sized products of all the samples.  For every 100 points, you get to take $10 off in the Birchbox shop.  Additionally, a Birchbox membership gets you exclusive access to their extensive library of beauty articles, how-to tips, and videos.  I really can’t say enough great things about it!  I’ll make sure to keep blogging about the monthly Birchboxes so you can decide if this is something you’d like to do.  I figure for $10 a month, you can’t go wrong!

Note:  I have not been paid or reimbursed in any way by Birchbox or its affiliates to write this blog review.

Saturday, March 5, 2011

Kat Von D True Romance Eyeshadow Palette in Truth

Without getting into what I think of her personal life, I really like the Kat Von D makeup line exclusive to Sephora.  Her most recent True Romance eyeshadow palette, Truth, caught my eye immediately.  I was intrigued by the crazy greens coupled with the pinks and purples.  I wasn't sure how to pull off a look with this product, but after having fun experimenting, I created a couple fun looks to show you.  

First, let's talk about the colors included in this palette.


 THE PALETTE:

COLORS
TOP ROW: 
Sugar Skull (vanilla metallic with greenish gold flash)
Long Distance (opaque citron green metallic)
Snake Eyes (pale green metallic with a slight gold flash)
Finland (greenish blue cream)

BOTTOM ROW:
Prague (very opaque dark purple with pinkish flash)
Galeano (medium purplish pink metallic)
Rehab (light pinkish gold metallic)
Sister (chalky peachy pink matte)


Swatches on my arm.  I did the swatches over the NYX Eyeshadow primer base in White.


My favorite color is definitely Long Distance.  It's such a great bright citron green!  I also love Prague for my crease.  Sugar Skull and Rehab work great for highlights and under the brow.  I don't really care for Finland.  It's the only cream in the palette.  I really had to work to get it to show up in the swatch.  If you work with it too much, it just sort of blends away.  Definitely not a buildable color.  And I also don't care for Sister.  Again, I had to really work for it to show up on the swatch.  It's very chalky and hard to work with.  

I love the palette, but my biggest complaint is that it really needs another crease color.  Unless you're going for a really subtle look, Prague is the only good crease color in this palette.  But the way I look at Kat Von D palettes is that they are not meant for subtlety.  They are bold colors and are definitely made for a more adventurous and edgy look, which is why I have great fun experimenting with them!

The first look I did was a smokey eye using Galeano on my lid, Prague in my crease, and Rehab on my brow bone:


Average White Girl Recipe For Kat Von D Truth Smokey Eye:
  1. Prime eyes with Urban Decay Primer Potion.
  2. Apply Rehab to inside corner of eye and bring up and along the brow bone.
  3. Pack lid with Galeano.
  4. Use a fluffy crease brush and grab some Prague.  Using a "windshield wiper" type motion with your brush, feather it into your crease and work it up to the brow bone.
  5. Use a stiff dome crease brush and grab some more Prague.  Use a "windshield wiper" motion again, but this time focus on the outer corner of your lid.  This will create a V shape that will blend into your crease and create that "smokey" look.
  6. Apply more Prague to the lash line from the outer corner and blend towards the inner corner.
  7. Apply Galeano to the lash line from the inside corner and blend it into the Prague.
  8. Go back with more Galeano and apply to lid again.
  9. Go back with more Rehab and apply to brow bone again.  Be sure to blend it down into the Prague, but not too far down.  Just enough to soften the line.
  10. Line top lash line with your favorite black eyeliner.  I used LORAC's Front of the Line PRO liner in Black.
  11. Curl lashes and apply your favorite black mascara to both top and bottom lashes.  I used Maybelline The Colossal Volum' Express in Glam Black. 


In this example, I was going for a more adventurous, dramatic look using Long Distance, Sugar Skull, and Prague:


Average White Girl Recipe For Kat Von D Truth Look: Long Distance/Prague/Sugar Skull:
  1. Prime eyes with NYX Eye Primer Base in White.  When I use bright colors, I like using this base, because the bright colors really pop on the white and keep the color from fading.
  2. Apply Sugar Skull to inside corner of eye and bring up and along the brow bone.
  3. Pack lid with Long Distance.
  4. Use a fluffy crease brush and grab some Prague.  Feather it into your crease and work it up to the brow bone.
  5. Apply more Prague to the lash line from the outer corner and blend towards the inner corner.
  6. Apply Long Distance to the lash line from the inside corner and blend it into the Prague.
  7. Go back with more Long Distance and apply to lid again.
  8. Go back with more Sugar Skull and apply to brow bone again.  Be sure to blend it down into the Prague, but not too far down.  Just enough to soften the line.
  9. Line top lash line with your favorite black eyeliner.  I used LORAC's Front of the Line PRO liner in Black.  In this example, I made very dramatic wings with my liner to make the look really dramatic and fun.
  10. Curl lashes and apply your favorite black mascara to both top and bottom lashes.  I used CoverGirl LashBlast Luxe Shimmery Volumizing Mascara in Black Platinum.
I hope you enjoyed these looks I created using the Kat Von D True Romance Truth palette.  I'll put together some looks using Snake Eyes, Finland and Sister sometime soon.  Don't be afraid to use bold colors and have fun with them!


Wednesday, February 16, 2011

Benefit New Product Alert: Prrrrowl!

I am a huge fan of Benefit Cosmetics.  Although they are on the pricey side (paying for the pretty packaging!), their products are quality, and I love how they mix a fresh faced look with vintage glamour and out of the box concepts.

Their newest product is called Prrrowl.  I don't own Prrrowl, but I checked it out at Ulta the other night. Basically, it's a mascara top coat on one end and a lip gloss on the other.  I know, weird, right?  But the common theme with both products is they contain peacock blue glitter.


The mascara is intended to be worn as either a top coat over your favorite shade of mascara, or it can be worn alone.  It's a black tint with pretty peacock blue colored glitter.  I tried some on, and I have to tell you, it's VERY subtle.  I'm a huge glitter gal myself, so I was hoping for something that screams out BLUE GLITTER MASCARA!!!  But unless you point out to someone that it has blue glitter in it, no one will be able to tell.  I've read some reviews on the product, and people are using it as a liquid eyeliner in lieu of mascara.

As far as the gloss goes--it goes on shimmery pink.  After awhile, the pink wears off, and you have blue glitter on your lips.  A little strange.  I guess it's supposed to make your teeth look whiter.

Here is a video review of the product.  I couldn't even tell the difference when she put the gloss or mascara on.  Disappointing.


I think the concept is cute, but just not very practical.  The mascara needs more blue glitter in it to show up well on your lashes, and the gloss needs less glitter in it so you don't end up with blue lips.  For $28, I'm probably not going to own this one anytime soon.  I wish you could buy the mascara and the gloss separately.  I'd buy the mascara for $15-$18 on its own.

If anyone purchases this product, please leave a comment and let me know how you like it!

Friday, February 4, 2011

New LORAC Multidimensional Beauty Collection for Eyes and Lips

LORAC always has really great sets at decent prices.  I like their sets, because they don't give you trial sizes of everything and slap a $50 price tag on it.  You get full sized products at a pretty reasonable price.

I recently purchased LORAC's new Multidimensional Beauty Collection for eyes and lips.  The particular set I bought is being sold exclusively at Ulta stores for $35 ($88 value).  The set touts glamorous "3D sparkle," and it contains three "prismatic, light reflecting, holographic shadows for dramatic, shimmering color" in Opalescent Gold with Pink Pearl, Amber Bronze with Gold Pearl, and Red/Brown with Green Pearl.  Also included in the set is a Multiplex 3D lip gloss in color Ulta Glam (peachy pink sparkle).  The products are all packaged in a blingy bag that can double as an evening clutch.


This set is based on the gimmick of everything being 3D and multidimensional/multiplex.

The first thing I noticed when I unpackaged the set is the neat bag.  It's hard to see it in the above picture, but below is a better one that shows how the colors change from goldish green to pinky magenta.  Plus, the bag is really well made.  There is a zipper pocket inside, and there is just enough room for the essentials for a night out on the town.  You could definitely throw your phone, cash/credit cards/ID, and makeup touchup necessities in here.  This bag is definitely a quality item and is not a cheaply made freebie.


You get 3 full size shadows and one full size lip gloss.  The back of the box shows two ways to wear the shadows:  dry look and wet look:


I first tried the dry look and was not overly excited about how it looked.  So I started over and tried the wet look.  I am not crazy about the Red/Brown with Green Pearl shadow (especially dry).  It definitely did not come off as green as it looks in the picture above.  But I can say for sure the colors change in different lighting, which indeed makes the shadows multidimensional, although I hesitate to say 3D.


Average White Girl recipe for the LORAC Ulta exclusive Multidimensional Wet look:
  1. Prime eyes with Urban Decay Primer Potion.
  2. Apply Red/Brown with Green Pearl to lid.
  3. Apply Amber Bronze with Gold Pearl to outside corner of eye and blend into the crease and up toward the brown bone.
  4. Apply Opalescent Gold with Pink Pearl to the brow bone and around inside corner of eye.
  5. Apply Amber Bronze with Gold Pearl along the lower lash line about 2/3 the way from the outside corner to the inside corner of the eye.
  6. Apply Opalescent Gold with Pink Pearl around the inside corner of the eye and along the lower lash line to blend into the Amber Bronze.
  7. Apply Urban Decay 24/7 Glide On Eye Pencil in Underground along upper and lower lash lines.  I created a winged effect on my upper lash line, then I smudged it out on my lower lash line.
  8. Curl lashes and apply a generous coat of your favorite black mascara to upper and lower lashes.
  9. Optional:  Apply LORAC 3D Liquid Lustre Shimmering Top Coat over entire eye or just on brow bone.  This product is also part of the LORAC 3D line.  I applied it to my brow bone and a little to my cheek bones.  It's hard to see in these pictures, but when the light caught it, you could really see the shimmer.  The product comes in a dropper bottle, and I found it works best to squeeze a drop onto the back of your hand and use a rounded shadow brush to dab it on.  You have to work quickly, because it dries fast!
Here are swatches of the wet shadows.  The top half of the swatch is with the 3D Liquid Lustre Shimmering Top Coat over it.  The bottom half of the swatch is simply the shadow applied wet. 
Amber Bronze with Gold Pearl, Red/Brown with Green Pearl, Opalescent Gold with Pink Pearl
The color intensities changed from dark to light when I moved my arm and caught different lighting.


Finished look!  I'm wearing the 3D lip gloss in Ulta Glam.
And how do I get that rosy glow on my cheeks?  With Benefit's
Benetint!

As gimmicky as this new LORAC set is, I do like the finished look.  The lip gloss is a peachy pink and is a great day time neutral look.  The shadow colors are unique, and even though I'm not a huge fan of the Red/Brown, I will definitely use the Amber Bronze and Opalescent Gold with other truer brown shadows.

LORAC also has an exclusive going on with Sephora right now.  They are offering the LORAC Multidimensional 3D Eye Shadow Palette for $38 (a $108 value).  You get six shadows.  Three are the same ones from this post (i.e. Opalescent Gold, Amber Bronze, and Red/Brown).  The three additional shadows are Silver with White Pearl, Royal Blue with Electric Blue Pearl, and Midnight Black with Holographic 3D Glitter.


Monday, January 24, 2011

Stila Color Wheel: Lavender Look (dry brush)

I'm continuing to experiment with my Stila Color Wheel and loving all the combinations!  Today, I tried out the Lavender Look.  The three colors used are White, Lavender, and Eggplant.  These colors are located at 8:00 on the color wheel:


The Lookbook specified to use a wet brush when picking up the shadows.  The look is very bold and dramatic, which I feel is more of a night time look.  I just wanted a simple day time look, so I used a dry brush instead of a wet brush.  Here is what the Lavender Look looks like when used with a WET brush:


When I dry brushed the shadow, the results were more of a soft smoky grey eye that was perfect for day time wear.  As you can see, the difference between using a wet brush and a dry brush is huge:


 Average White Girl recipe for the Stila Color Wheel Lavender Look:
  1. Prime eyes with Urban Decay Primer Potion.
  2. Apply White from lash line to brow bone.
  3. Apply Lavender to lid and blend up into crease
  4. Apply Eggplant along lash line and blend into crease up toward brow bone.
  5. Apply Eggplant along the lower lash line about 2/3 the way from the outside corner to the inside corner of the eye.
  6. Apply Lavender around the inside corner of the eye and along the lower lash line to blend into the Eggplant.
  7. Apply Benefit High Brow just under brow arch and blend.
  8. In this example, I used Maybelline Eye Studio Lasting Drama Gel Eyeliner in Blackest Black to line my lids.  Using this product will be a topic of a future post.  I absolutely LOVE this product.  It requires practice and a steady hand, but I love the results I get from it more than any other pencil eyeliner or felt tip pen liner out there.  I DID NOT use the brush that came with the product.  I used the Sephora angled liner brush #15, which works like a charm.  
  9. Curl lashes and apply a generous coat of your favorite black mascara to upper and lower lashes.
This is a nice way to show off the winged liner I like to create with the gel liner.  The shadows are pigmented enough to provide a nice soft smoke day time look, yet light enough to really showcase that perfect winged liner.

I'll do the wet brush Lavender Look in a future post to showcase a great night time look.  Until then, I hope you all enjoy this fun look!